Tuesday, November 12, 2013

Part 1 - Solar Power for your RV


 Many fans of camping in the great outdoors have gone from tent camping with no more need for electricity than what it takes to power a flashlight, to camping in an RV that needs electricity for lights, water, a furnace fan and maybe a laptop and stereo among other things.  If you're camping in a place where you can't plug in to "shore power" and  don't want to use a noise-making generator, this presents a problem, especially if you want to stay out more than a day or two.


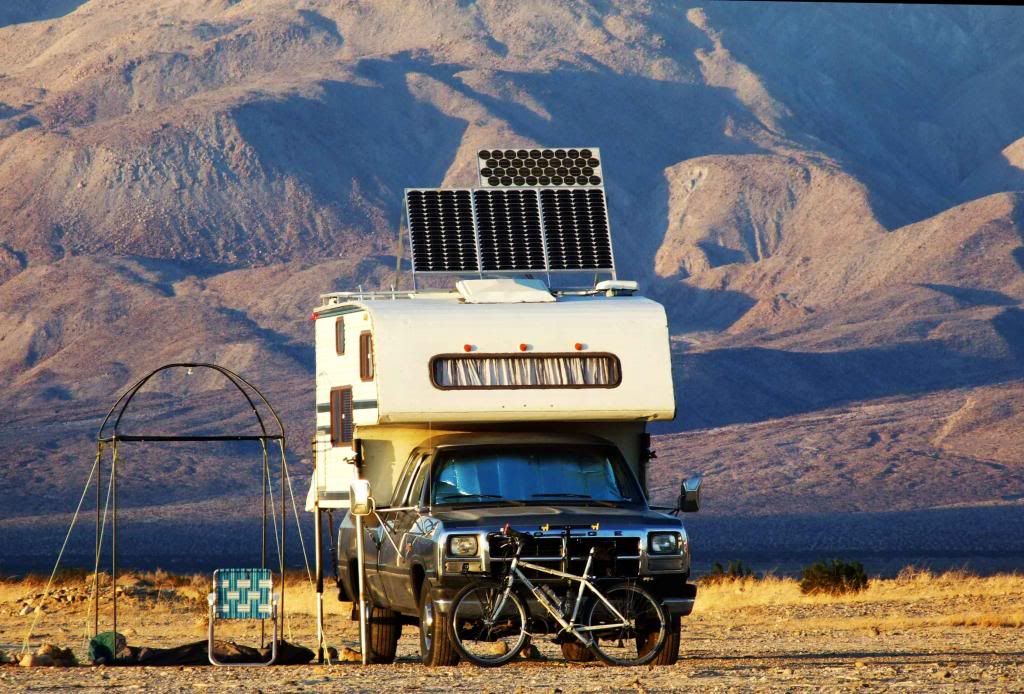
190 Watts Tilted into the Sun in the Desert Southwest of the U.S.


My first attempts at switching from campgrounds to boondocking (free camping without any hookups) were highly rewarding in terms of peace, quiet and solitude, but dismal failures in the electrical category.  I had two batteries in my truck camper so was able to go about 5 days before running them down, but that was it.  I wanted to be able to stay out for several weeks at a time or longer, so knew I had to resolve this issue.   Being a huge fan of peace and quiet while camping, a generator was out of the question.

I had a 40-watt solar panel laying around in my garage that came from a small used 5th wheel I had owned years earlier.  The former owner had left it in the rig, but I had never hooked it up.  So I decided to see what it could do.  I didn't have a charge controller, so bought a cheap one online and hooked it all up.  It helped some, but it wasn't enough to keep up with even my minimal power needs.  Again, I was out of power in less than a week.    Worse yet, the cheap on/off charge controller I had bought was damaging my batteries without me even knowing it.


January 2009, with the original single solar panel


Knowing that I never wanted to be dependent on campgrounds again and didn't want to use a generator, I became keenly interested in my electrical system and set out to gain as much practical knowledge about it as I could. 

This nine-page series of articles explains what I learned and what I did to resolve those electrical issues.  And although this deals primarily with RV electrical systems, it can be applied to any 12v off-grid system.  


After reading this you will know how to size your system, choose your solar panels, controller, wires and batteries, as well as how to put it all together.  Links to places to shop for solar supplies are included at the end of the series at the bottom of part 9.


Disclaimer

I am not an electrician, and don't have any professional experience in this field.  My professional background is in computer programming and technical support. So I'm just a guy who had a problem and set out to to solve it on my own.  I like sharing the knowledge I've gained in hopes of helping others, but I don't guarantee your results.  I advise anyone who is not confident or comfortable with doing this kind of work in a safe manner to hire a professional to do it for them.  But if you choose to go that route, it might be a good idea to learn some basics so you can tell the difference between a good and a bad installation.  Finishing this blog should give you the information you need.

RV Solar in a Nutshell

The RV solar system consists of solar panels, wiring, a junction box (if you have more than one panel), a charge controller, batteries, a couple of kill switches and fuses (or circuit breakers).

So you buy some panels, batteries, and a solar charge controller, wiring, connectors, two kill switches and some fuses.  Mount the panels wherever they're going to go.  Now mount the charge controller in your rig, and put the batteries wherever they're going. Wire batteries together.  Then connect the batteries to the charge controller, with a kill switch and a fuse on the positive lead.  


If you have more than one solar panel, connect them together in a junction box with a fuse near the positive terminal of each solar panel.  Next wire the solar panel junction box to the charge controller, adding a kill switch on the positive lead.  If you only have one solar panel, you can skip the junction box and connect the panel directly to the charge controller (but still add the kill switch on the positive lead). 


                               Wiring Diagram for a Typical 12v RV Solar Charging System
.

But there are decisions to be made along the way in terms of how big your battery bank needs to be, how many watts of panels you need, what kind of charge controller to use, and the method and size of wiring you want to use.  You should also consider adding a monitor so you can see what's happening with the system.  That is all covered in the rest of this series.

Skip the following section if you are already familiar with basic electricity, watts, amps, volts, batteries, etc., and how it all works in an RV.
 

RV Electricity Basics

Some basic electrical facts to keep in mind when designing your system.

1.  While your RV is plugged in to a campsite's electrical hookup, your 120v appliances run directly off of mains power via the 120v electrical outlet at the campsite.  A converter in your rig takes some of that 120v power and converts it to 12 volt direct current to power your lights, water pump, furnace fan, refrigerator circuit board, etc., as well as to recharge your batteries (older converters weren't powerful enough to recharge batteries, but newer ones are).

2.  When your RV is not plugged in to an electrical hookup or a generator, all your electrical power must come from the house batteries.  This is not a problem for your 12v appliances, but your 120v appliances like 120v phone chargers, laptops, TVs, stereos, etc. won't run on 12 volts.  That's where an inverter comes in.  An inverter takes that 12v dc power and changes it to 120v alternating current (there are 220v models for other countries as well).  Inverters come in many sizes, from quite small to quite large, and not all RVs come with them.  Therefore those who want to boondock and still be able to use 120v appliances need an inverter, assuming you're not going to run them from a generator.  Inverters are widely available from many different sources, from Walmart to automotive stores to countless online sources.  I'm not going to spend any time talking about inverters because they don't really have much to do with solar charging your batteries in an RV.

3.  Understanding what volts, amps and watts are is quite helpful.  A common simplistic and not-entirely-correct-but-good-enough-for-our-purposes analogy is made between electrical systems and plumbing systems.  You can think of an electrical wire as being similar to a water pipe.  The pipe carries water, whereas the wire carries amps*.  Water pressure pushes water through the pipe, voltage pushes amps through the wire.  You can talk about volts and amps together in a unit called a watt.

watts = volts x amps

The above formula is important in solar electric systems because solar panels are described by how many watts they are capable of producing, but your batteries are usually described in terms of volts and amp hours.

An amp is a unit of electricity and is commonly thought of in hourly terms.  For example, if the label on an electric motor says it uses ten amps, that means it uses ten amps each hour.  If my laptop's power supply says the input is 1.5 amps, that means it uses 1.5 amps every hour that it is running. 

Where batteries are concerned, especially deep cycle batteries typically used in RV cabins, there are different sizes and they are described by their physical size as well as how many amp hours of electricity they can store.  

Their physical size is described by a "Group" number.  A Group 27 battery is physically smaller than a Group 31, for example.  This might be important to you if you have limited space in your RV for batteries and need to know what size to get to fit them all in the allotted space.  A list of battery dimensions by group number can be seen on this page at batterystuff.com.  Scroll down the page for deep cycle batteries.

Deep cycle batteries, as mentioned above, are also described by their capacity to hold electricity, in numbers of amp hours.  This is of primary importance to the boondocking RVer.  A 220ah battery can store 220 amp hours of electricity, meaning you could, theoretically, use 10 amps from that battery for 22 hours before it would be completely dead.  It's like a tank that can store 220 gallons of water, from which you could drain 10 gallons per hour for 22 hours before it would be dry.  You would never really want to do this with a lead acid battery though, because draining it completely damages it and shortens its life.  More about that later.

4.  How do you know how full a deep cycle battery is?  Well, lacking a decent built-in meter for tracking such things (and no, the idiot light monitor that comes with most RVs is not decent), you can check wet cells with a hydrometer (best way) or a volt meter.  Hydrometers are available at many automotive and hardware stores for as little as a few bucks.  But if you're using a volt meter, you won't get an accurate reading unless the batteries are at rest, meaning they haven't been charged for several hours, maybe 2, 12, or 48, depending on who you believe, and are not under a load
(nothing is connected to them and running).  If they've just been charged they will have a "surface charge" which inflates their actual state of charge (SOC).  It takes time for that to bleed off. And if they are under a load they will read lower than the actual state of charge, depending on how big the load.  So assuming they've been at rest for awhile, they are under zero load (as in not connected to anything), and are at a temperature in the mid to upper 70's fahranheit (25C), these voltages indicate a ballpark estimate on a 12v lead acid battery's state of charge:

12.7v = Full
12.2v = 50%
11.8v = Dead

This can vary by manufacturer and certainly by battery chemistry.  Check with the battery's manufacturer for its own recommendations.

As you can see by these numbers, your 12v battery is, for all practical purposes, dead if it only has 12.0 volts left in it.  That's kind of strange. 

When you charge that battery, you need to apply a voltage that is larger than the current voltage of the battery so the charger's "pressure" is greater than the battery's "pressure" which will force those amps into the battery.  There's much more to it than that, which I don't fully understand, but that's an easy way to think of it.  It sounded strange to me at first when I realized that the recommended charging voltage for my batteries is 14.8 (actually 7.4v for each 6v battery, but for the two of them wired together in series that would have to be doubled - more about this later).  But it needs those extra volts to get all those amps in there in a reasonable amount of time.


So, now what?

With that out of the way, let's continue.  There is a logical progression to this from start to finish.  It goes something like this:
  1. Figure out how much electricity you use while boondocking 
  2. Use that information to determine how many amp hours you need in your battery bank 
  3. Decide which type of batteries you prefer.
  4. Decide how many watts of solar panels you need.
  5. Decide which charge controller you want.
  6. Figure out your wiring needs.
  7. Put it all together

So, how much electricity do you use?  That's covered in the next article in the series - Part 2,  Where to Start.


*amps - in reality, the wire carries electrons.  Amps are a unit of measurement of the rate at which those electrons flow through the wire.  But to keep things simple I'll just refer to amps since that's what we're primarily concerned with.

Part 2 - Where to Start?

The best place to start with your RV solar power system is with figuring out your personal needs in terms of electrical power.  Some people seem to skip this step and just buy some batteries and maybe a solar kit* with little regard to whether or not it will meet their needs, which often results in either too little power capacity, or too much. I suspect most of the time it's the former.

To be absolutely sure how much power you normally use you can install a power meter in your RV, then record your daily usage.  With that information you can calculate an average number of daily amps used.  I have one and find it to be an invaluable resource in tracking my electrical usage as well as to judge the state of charge in my battery bank. 


The Trimetric TM-2025-A Meter


If you don't want to go to the trouble and expense of installing a meter, you could estimate your power usage by listing the amperage draw of each electrical appliance you use while camping as well as the number of hours you use them in a day, then multiplying those numbers together for each item, and, finally, adding all of the results to come up with a daily number.  You can find estimates of amperage draw of common RV appliances online, such as this one from KOA.  This method won't be anywhere near as accurate as a meter, but it could get you in the ballpark if you're as accurate as possible about estimating your usage.

No matter which way you go, you might want to add a little extra, maybe ten percent or so, just to make sure you're not building a system that supplies the bare minimum (or less) of electricity you think you'll need while boondocking.

If you've already got adequate batteries in your rig and are primarily interested in adding solar to charge them, jump ahead to Part 5, The Solar System.  Otherwise, read on.

Now that you know how many amps you want to use on a daily basis, you need to know how much battery capacity (amp hours) you need in your battery bank.  That's covered next in Part 3, How Long Should Your Batteries Last?


*Solar Kits - beware.  Some (not all) of the solar kits I've seen out there are grossly inadequate for RV use beyond maybe keeping batteries from going dead while in storage, and sometimes not even for that.  The problem is with the components some of them come with - poor charge controllers, wire that is too small, or extra things you don't really need - like light fixtures.  They may seem inexpensive, but this is one of those cases where sometimes "the cheap comes out expensive," and if you calculate how much you're paying per watt you may discover it's not cheap at all.  Poor charge controllers can damage your batteries over time.  Inadequate wiring will choke your system.   If you are interested in one of these, at least finish reading this series first, so you will know exactly your needs and whether or not the kit will work for you.  If you blindly leave it up to them to decide what you need, you might end up with something that won't meet your needs, costs you a high price per watt or kills your batteries before their time.

Part 3 - How Long Should Your Batteries Last?

You may have some experience already with running out of power while you're out camping, and if that's the case then you probably know how long you can usually go before that happens.  But when your battery or batteries are so low that your lights are dim or your water pump won't pump water, you've already gone beyond where you should have stopped draining them. 

Draining your lead acid batteries below 50% of their capacity has a negative effect on their lifespan.  The farther you go below 50% on a routine basis, the more often you can expect to be buying new batteries.  This applies to deep cycle batteries, which are designed to be drawn down quite a bit before being recharged.  But if you're using typical starting batteries like that found in your car, you can expect to destroy a battery much, much faster using it as an RV house battery.  They aren't designed for this type of use.

Another thing to consider in answering this question is whether or not you have a means of charging your batteries while you're out camping.  If you don't, then you need your batteries to last for the duration of the trip, depleting them no more than 50% or so.  If you plan to boondock for relatively short periods of time, you might be able to achieve that by merely adding one or more batteries to your existing bank of batteries. 

You can figure out how many amp hours of battery storage capacity you need in your bank of batteries by figuring out your typical daily electrical usage (as discussed in Part 2) multiplied by the number of days you want to camp, and doubling that number to keep from depleting below 50%.

Battery bank capacity needed = (typical daily amp hour usage) x (number of days needed) x 2

The above formula applies even if you have a means of recharging your batteries while out camping.  In that case your "number of days needed" might be lower.  For example, with my system I like to be able to go about 5 days before running down to 50% of battery capacity, assuming no charging during that time.  This way if a 5-day storm moves in where there is little sun, I am still ok.  I could run into trouble if there's no sun for longer than that, but that's never happened yet. 

If I didn't have any way to charge the batteries, I'd want them to last longer - at least a week or maybe two.  But that would be difficult to achieve without lugging along a whole slew of batteries.  I could probably fit four batteries in the areas of my truck bed not occupied by the camper, but I prefer to use most of that for storage of other items.  So by having a solar charging system on the roof, not only can I stay out as long as I want without regard to running low on power, I also have a little extra storage space since I only need two batteries.

I typically use about 25 amp hours daily and want the batteries to last for 5 days.  So using the battery bank capacity formula above, 25 x 5 x 2 = 250 amp hours.  Well, I only have 220 amp hours in my battery bank, so that really works out to being able to stay out 4.4 days before being depleted to 50% without charging.  So I'm a bit short of my 5-day goal, but in reality even on cloudy days there is still some charging taking place.  This system has worked great for me as it is, and if I ever do run into a situation where the batteries are getting depleted due to inadequate sun, I wouldn't have a problem conserving electricity until conditions improve.


Before we move on, a warning:  Beware, some manufacturers are trying to fool you.  

While looking for a new battery recently I discovered that some list the amp hour rating at the 1 amp discharge rate.  This is highly deceptive.  A deep cycle battery discharged at a 1 amp rate will take longer to discharge (and thereby appear to have a higher amp hour capacity) than if it had been discharged at a higher, more realistic rate.  It used to be that amp hour ratings on batteries were always listed at the 20-hour rate, meaning the number of amps of constant discharge to enable that 12v battery to last 20 hours before being discharged to 10.5v.  But apparently at least some manufacturers are playing with those numbers now so they can advertise a deceptively higher amp hour rating.   The higher the load on a battery, the faster it discharges (disproportionately faster, a phenomenon called the Peukert Effect).  

The battery I was looking at recently said it had a 109 amp hour capacity calculated at the 1 amp rate.  Theoretically it would last 109 hours at that discharge rate before being completely dead.  I decided to plug these numbers into a Peukert Effect calculator to see how many amp hours it would be rated at if it were tested like its competition is - at the 20-hour rate.  It turns out that this is really about a 93 amp hour battery when tested that way (with a 4.67 amp load, which takes 20 hours to discharge the battery).  The higher the discharge rate, the less efficient the battery becomes because of the Peukert Effect.  

If you really planned to run a 1 amp load with this battery, then yes you could call it a 109 amp hour battery.   But I don't know of anyone who does that.  Most people with RVs probably discharge their batteries at an average rate that is many times higher than that.   Regardless, the playing field for battery ratings should be a level one, and clearly it's not when these kinds of shenanigans are going on.

To learn more about the Peukert Effect, see this page.  A Peukert Effect calculator is at this page at csgnetwork.com.

Now that you know how long your batteries need to last and how much amp hour capacity they need to have, what kind should you get?  That's up next in Part 4, What Type of Batteries Should I Use?

Part 4 - What Type of Batteries Should I Use?

Should you go with 6v batteries or 12v?  Should you choose Flooded Lead Acid (wet cell) batteries or AGM (Absorption Glass Mat)?  Should you choose a typical car or marine starting battery, or a deep cycle battery?  These choices are discussed below.

12v or 6v?


I have two 6v golf cart batteries in my bank, and they perform well, even at 6 years old.  For those who are unfamiliar, the idea is to wire two 6v batteries together in series, which turns the two into one big 12v battery.  The main reason I bought them was, at the time, the cost per amp hour was cheaper than any deep cycle 12v batteries I could find.  Just based on the reading I have done over the years, I suspect 12v deep cycle batteries would perform just as well for me, assuming proper maintenance.  Others may disagree.

In making your own decision, here are some facts to consider:


  • 12v batteries can be added individually to your battery bank.  In other words, you could have three 12v batteries wired parallel in your bank, whereas with 6v batteries you must have an even number of batteries since pairs of them must be wired together in series to achieve 12v.  This could be a factor to you if you want to fill up all available physical space with as much amp hour capacity as possible.  For example, maybe you have space for three batteries but not four.  You could use three 12v batteries, but only two 6v.  I suppose you could use two 6v and one 12v battery in your bank, but many advise against mixing battery types and capacities in the same bank.  One reason for this could be different charging recommendations for different batteries.  If you have a set of batteries that are supposed to be charged at 14.8v mixed with a battery that is supposed to be charged at 14.4v, you could be shortening the life of one or more of those batteries by charging at a different voltage than recommended.  There are probably other reasons as well.  Some also advise against mixing older and newer batteries.  Others disagree.  I have no practical experience with this and have not researched it so will not comment on it. I only mention it so you can do further research if you are considering this.


  • If a 12v battery fails, it can be disconnected from the battery bank and the remaining batteries in the bank will still provide power to your rig.  If a 6v battery fails, on the other hand, it and its paired battery must both be disconnected from the system, since disconnecting only the failed 6v battery would leave an odd 6v battery in a 12v system, which will not work.  So if you only have two 6v batteries in your system to start with, you would be left with no power even if only one of those batteries failed. While this may seem to be a big disadvantage to pairs of 6v batteries, another thing to consider is the fact that 6v batteries contain half as many cells as 12v batteries.  If one cell fails, your battery has failed. Twice as many cells in a 12v battery means twice as many chances for that battery to die.  But then again, if you have two 12v batteries the only way to lose both of them is for a cell to go bad in each one.  With two 6v batteries, you only need one bad cell between the two to lose the pair.  Which one is more likely to fail?  I suspect the 6v pair, but not by as great a margin as it might seem at first glance.  The good news is, for batteries that have been used and maintained properly I think it's fairly unusual for them to fail before they're just plain worn out.  Anyway, my head is spinning now, so let's move on.


  • 6v golf cart batteries are heavy duty, full "deep cycle" batteries that typically are manufactured with heavier plates than 12v batteries.  For this reason, many people believe they are more robust than 12v batteries.  However, others claim that 12v batteries that are maintained properly will last just as long as a 6v battery.
 
  • Other factors:  If you are using 12v batteries wired in parallel, then you would add together the amp hour capacity for each battery to determine the capacity for the entire bank of batteries.  If, on the other hand, you are using pairs of 6v batteries where each member of a pair is wired together in series (which is the only way they can work in a 12v system), then the capacity for each pair will be the same as the amp hour rating of the lowest capacity battery in the pair.  This is because wiring two batteries together in series adds their respective voltages together but does not add the amp hour rating, and the pair is only as good as its weakest member.  When the weak member is dead, for the purposes of a 12v electrical system, the pair is dead, even if the stronger member still has power.  But I would avoid mixing batteries with different capacities.   Examples:
  1. Your battery bank consists of two 12v batteries wired in parallel, and each battery has a capacity of 105 amp hours. In this case your battery bank has 12v and its capacity is 210 amp hours.
  2. Your battery bank has two 6v batteries wired in series, and each battery has a capacity of 220 amp hours.  In this case your battery bank has 12v and its capacity is 220 amp hours.
  3. Your battery bank has two 6v batteries wired in series.  One has a capacity of 220 amp hours and the other has a capacity of 180 amp hours.  The battery bank then has a voltage of 12v and an amp hour capacity of 180.

If you aren't quite sure what wiring in parallel and series means, a good resource for that is this article at solarray.com. 

Wet Cell or AGM?


Beyond the 6v vs. 12v question, there is also the matter of the "type" of battery to use.  Should you use Flooded Lead Acid batteries (wet cell), Gel Cell, or AGM (Absorption Glass Mat)?  I'm not going to go into the details of all these beyond saying that wet cell batteries are probably the best value for your money  if you maintain them properly and don't misuse them.  The maintenance is in keeping them topped off with distilled water, keeping terminals clean, periodically charging them and periodically equalizing* them.  Most recommend checking water level once per month.  If you run them dry, your battery life will be shortened, possibly drastically shortened.  A good read on battery maintenance is this one at Trojan's website.

Charging flooded lead acid batteries is fairly straightforward, but different kinds have different recommended charge settings, so manufacturer's recommendations should be followed to get the most out of your batteries. 

Gel Cells are typically not used due to their problematic sensitive charging needs so most who are looking for maintenance free batteries seem to go for AGM. 

AGM batteries are much more expensive than flooded lead acid, but require little maintenance and are not required to be mounted upright, as wet cells are.  There is nothing in them that can spill.  They are practically immune to freezing.  They have a very low "self discharge" rate, meaning you can leave them on a shelf for much longer than wet cell batteries without them going dead.  They are pretty much "connect and forget."  But you pay a steep price for that.

Starting or Deep Cycle?


Absolutely, without a doubt, you want to avoid "starting" batteries and go with deep cycle.  Deep Cycle batteries are designed for the kind of use they will get in an RV cabin, e.g., being slowly drained down as much as 50% before being recharged again.  Starting batteries are designed to supply power for high loads over a short amount of time, such as to power a starter motor, and then be immediately recharged fully.  They will work in a pinch as an RV house battery, but will be damaged by repeated use in this way and will die an early death as a result. 

Also, if a battery has a "Marine" label on it, that does not make it a deep cycle battery.  Some batteries are marketed as hybrids, supposedly for use as starting batteries as well as deep cycle use.  I would avoid these.  Go with full deep cycle batteries.

For a much more extensive look at batteries and everything you never wanted to know about them, see Northern Arizona Wind & Sun's battery FAQ and the Battery Council International's lead acid battery page.

Ok, now you've got your batteries figured out as well as the amount of time you need them to power your rig before being recharged.  But if you're boondocking longer than that amount of time, you need a way to charge them up again.  That's where solar power comes in.  Continue reading with Part 5, The Solar System.


* Equalization a feature available in better charge controllers.  It is the process of taking fully charged wet cell (flooded) batteries and for several hours applying an otherwise excessively high rate of voltage.  For my batteries this is about a half volt higher than their recommended normal maximum charging voltage, or 15.3v instead of the recommended 14.8v, plus or minus according to temperature.  Many battery manufacturers recommend that flooded lead acid batteries be equalized periodically, like maybe once a month or so.  The reason for this is over time sulfate crystals tend to solidify on the battery plates.  This reduces battery efficiency and capacity.  In addition, stratification of the electrolyte mixture can occur in which the concentration of acid is stronger at the bottom of the battery than at the top.  Individual battery cells begin to drift apart in terms of their respective charges.  Periodically equalizing the battery gets the mixture boiling which eliminates stratification and gets the sulfates back into the mixture and off of the plates, and can reduce cell charge inequalities which can restore efficiency and battery capacity.

Part 5 - The Solar System

So, now you've got adequate batteries for your rig, but you want to boondock for longer than your battery bank will allow without being drained below 50%.  And you have decided to go with a solar solution to the problem.

What do you need for your system?  Well, you could take your rig down to your nearest solar system installer and let them answer all those questions, install the system, and send you on your way with a much lighter wallet.  And even if you decide to go that route, it will help to learn all you can about the process first, so you can tell if they are worthy of your business or not, and whether or not the system they propose will meet your needs.  There are countless stories out there of inadequate systems and shoddy installations.  If you do your homework ahead of time you probably won't end up being another dissatisfied customer venting your anger on an internet forum.  And if you're one of those folks who believes you need to do it yourself if you want it done right, or you're a tightwad, or both (like me), then read on.

In addition to batteries, your solar charging system will consist of the following parts:
 

  • Solar panels
  • Charge controller
  • Wiring
  • Fuses
  • Kill switches

We'll handle these topics next, starting with Part 6, The Panels.

Part 6 - The Panels

How Many?

The first thing you need to decide about solar panels is how many you need.  First of all, how much physical space do you have on the roof of your rig for solar panels?  This could be a limiting factor. 

Assuming there is enough space to meet your needs, how do you decide how many watts to put up there?  One rule of thumb is to have enough wattage on the roof to replace your average daily amperage use in half a solar day in the location where you will usually be boondocking.  By "solar day" I mean the number of hours in a day you can expect peak solar performance depending on your location.  A map which shows this kind of information is called an insolation map.  One such map for the U.S. is provided by Wholesale Solar here.

Why so much wattage?  Because, practically speaking, you never get as much wattage out of a solar panel as they are rated, for various reasons.  For one, clouds often interfere.  For another, to get the most amount of watts a panel is capable of producing, it must be aimed directly at the sun 100% of the time, and that is just not practical without installing an automatic dual axis solar tracking system at great expense.  Ambient temperature affects a panel's performance (they are less efficient when it is hot out, for example) as well as the panel's age.  The reality is, you will never experience your panels' full rated output all the time because of these shortfalls of the technology.  It's just the nature of the beast.  To compensate for that, you need more wattage on the roof. 


80 Watt Solar Panel


So let's take a look at this example. You think you'll use 50 amps of power on average from sunset until sunrise the next day, in a location that has a 5 hour solar day.  So, using the rule of thumb mentioned above, you want enough watts on the roof to return the battery bank to its former state of charge in 2.5 hours.  An unpleasant fact of life is when you use an amp hour from your battery bank, you have to replace more than an amp hour to get the battery back to its former state of charge.  This is due to inefficiencies in the system and in the batteries themselves.  How much more is debatable, but for the sake of this example let's say 10 percent. 

So for this example you would need to put 50 + (50 x .1) = 55 amps back into the system in 2.5 hours, or 22 amps per hour.  Since watts = volts x amps, and if your panels produce 14.4v, that means you need 14.4v x 22a = 317 watts (roughly) on the roof.  This is not exactly correct, since the voltage and amperage will vary during the charging process and your panels are not going to be producing maximum wattage all the time.  So this will not guarantee that your system will actually return the batteries to their former state of charge in 2.5 hours due to the inefficiencies mentioned above.  But it will make it much more likely that they will do so in a solar day, day after day, than if you designed the system based on taking a full solar day to recharge.  This is not an exact science because there are so many variables that will affect your system.

Maybe the rule of thumb mentioned above is too severe for you.  It's certainly not written in stone, and different expectations will certainly change your needs for solar recharging.  If you only want to prolong the time you're able to camp with no expectation of being fully recharged every day, then maybe planning on taking a day or more to recharge fully would be sufficient for you.  Or maybe you are OK with supplementing the solar with a generator from time to time.  Or maybe you simply don't have the roof space for so many panels.  Or any number of other factors.  The decision is yours. 


Reducing Electricity Usage


Another way to reduce the amount of wattage needed on the roof is to reduce your average daily electricity usage.  One way to do that is to replace traditional incandescent light bulbs with LED lighting which uses a fraction of the electricity needed by those traditional bulbs.  Avoiding use of high-draw appliances such as a microwave or electric coffee pot is another way to reduce usage.  Appliances with that much of an electrical draw are going to require a much more substantial electrical and solar recharging system than would otherwise be needed.  If you've got a generator you could just plan to use those higher-draw appliances while the generator is running, or just do without those items.  This would allow you to build a lower capacity system than otherwise would be needed.  For me, it's not an issue.  I boil water on the stove for coffee and use a thermos to keep it hot, and don't have a microwave in the rig. 

Of course if you've got the roof space and battery bank to handle it, you can certainly design a system that will handle your higher-load appliances, with the exception of air conditioning.  As far as I know there is nobody out there in an RV routinely running an a/c system on battery power.  It's just not practical due to the high power demand and the huge battery bank that would be required.  There are some whose systems are big enough to start the a/c and run it for a short while, but keeping the rig cool throughout the day with a/c is just not in the cards if all your power is coming from batteries.  Those who run a/c while RVing are plugged into the grid or are running one or more generators that are big enough to handle the load.   Again, none of this is an issue for me.  I don't have a/c in my truck camper, and don't normally camp where it's hot enough to need it anyway.


Tilting

Wander out to Slab City, California, in the winter and you will see scores of rigs whose owners understand the importance of tilting panels when the sun's angle stays low.


If you camp in a location or time of year where the sun will be at a relatively low angle, having the ability to tilt your panels (even just on one axis) will improve their performance immensely. My panels tilt upward on a single axis, and in winter I usually leave them tilted at about a 45 degree angle all day while pointed at solar south.  "Solar South" is the position the sun is in at solar noon (the time of day that is exactly half way between sunrise and sunset).  In summer I don't bother tilting them since the solar day is so much longer and the sun usually passes almost directly overhead in my location.

I once did an impromptu test while camped in the Southern California desert in January by watching my array's output while tilted, as compared to when it was laying flat.  While flat it produced just 59% of what it did while tilted.  If you camp in winter when the sun's angle is low, single-axis tilting can be a big benefit. 

Dual-axis automatic tracking is probably prohibitively expensive, however.  In most cases it would probably make more financial sense to add more panels, assuming you have space for them, than to have an automatic dual-axis tracking system installed.

What Type?


Solar panels come in a variety of types and sizes.  I have three 50 watt panels and one 40 watt panel in my array that put out about 21.8 volts Voc (Open Circuit Voltage).  These, wired in parallel, work well in a 12v system.  There are panels available that put out much more, for use in 24v or 48v systems, for example.  Higher voltage panels can be used in 12v systems if the charge controller is capable of moderating the voltage.  The advantage of this is smaller wires can be used between the solar panel array and the controller without as much voltage drop as would occur in lower-voltage panels wired in parallel using the same wire size.  In the world of solar charging, Public Enemy #1 is shade, and Public Enemy #2 is voltage drop.

The same "higher voltage" effect can be achieved by wiring panels together in series, which adds their respective voltages cumulatively.  But again, this can only be done with a charge controller that has the capability of bringing the voltage back down for use in a 12v battery bank. This requires a certain type of Maximum Power Point Tracking (MPPT) controller.  More about MPPT later.

Solar panels also come in a wide variety of wattage capabilities.  When deciding which ones best fit your needs, you'll need to consider their physical size and how they will fit on your roof, if roof mounted.  If you want 300 watts on the roof, what's better for your situation - three 100-watt panels or a 200 and a 100?  Maybe a 230 and a 60 will get you close enough.  There are a wide variety of combinations and you'll need to make your decision based on physical size as well as price.  


To avoid complications and building inefficiencies into the system, buy panels with matching voltage ratings.  Mixing panels with different voltage ratings can be done, but the voltage of the array as a whole will be affected by that.  And if you're planning on using an MPPT controller, definitely avoid mixing voltages because this can adversely affect the MPPT controller's ability to calculate the maximum power point correctly.

Solar panels also come manufactured using different technologies.  Some of the different types are monocrystalline silicone, polycrystalline silicone, thin film and building integrated photovoltaics (BIPV).  They have different levels of efficiency, which directly translates to the amount of surface area a panel takes up to produce a given amount of electricity.  Obviously, there is not a lot of room on an RV roof, and even if you plan on setting your panels up on the ground away from your rig, you will likely want to minimize the amount of surface area your panels' take up.  So you probably want the most efficient technology you can get.  At the present time it appears that is monocrystalline silicone, but many use polycrystalline as well.


Where to buy? 

There are many outlets for solar equipment.  I've listed a few of them on the bottom of Part 9, Installation and Monitoring, but you can find many more by just doing an online search.


 Warranties

Finally, different manufacturers may have different warranties.  A rather standard warranty is a guarantee that in 25 years the panels are still capable of producing 80% of their rated watts.  You can find name-brand panels as well as inexpensive made-in-China panels that provide that same warranty.  

What's Next?

So, now that you've got the panels figured out, what about the charge controller?  That's covered next in Part 7, The Charge Controller.

Part 8 - Wires, Fuses and Switches

Now that you've got the main components figured out, you need to connect it all together.  It's really a rather straightforward process that just requires a little planning, if you want to do things right the first time.  Wiring diagrams are on the next page, but I'll talk a little about it here.


Wires


You need wiring to connect the individual solar panels together at a junction point, and then to connect that junction point to the charge controller.  Many (me included) route the wires down the refrigerator vent so no extra holes are made in the roof.  Then you need another set of wires to go from the charge controller to your battery bank, and wires to connect the individual batteries together in your bank. 


What kind of wire do you need?  To avoid inadvertently sabotaging your own system, get wiring that is big enough to minimize voltage drop along your wiring runs.  My system uses 6AWG (6 gauge) wire from each solar panel to a junction box on the roof (about 3 feet of wire from each panel to the box), then 4AWG (4 gauge) from there down to the charge controller, and then another run of 4 AWG from the charge controller to the batteries.  This is probably a bit of overkill considering the relatively low wattage of my system, but I wanted to overbuild it a bit in case I ever want to add more wattage to the roof. 
 

Voltage Drop

Why is minimizing voltage drop so important?  Well, let's say you have 400 watts on the roof, your wiring run to the controller is 45 feet long and you're using 10 gauge wire for that run (the size many RV manufacturers use in pre-wiring RVs for solar).  In full sun and assuming maximum panel output, your array is producing (as an example) 17.4 volts and about 23 amps.  But with such small wire, you have a roughly 11.9% voltage drop along the line, so only about 15.3 volts are reaching your controller.  That might sound like plenty, but remember we are talking optimum conditions.  In cases where it is cold outside your temperature sensor on the controller is going to want to bump up the voltage to compensate, even more so when equalizing, and it could very likely run short of volts to do that. 

Also, if you have an MPPT controller, limiting the number of volts available to it will diminish the advantages to having MPPT at all, and after paying such a premium price to have that technology in your rig it would be a real shame to cripple it by installing wires that are too small in your system.  Use a voltage drop calculator such as the one below to determine voltage drop along your proposed wire run:

Voltage Drop Calculator


Minimizing voltage drop is even more critical between your batteries and charge controller.  If you've got 10 gauge wires running 10 feet from your controller to the batteries for that 400 watt system, you've got a 3.11% voltage drop at 14.8v and 23 amps, which results in a loss of 0.46v over that ten feet.  So while the controller is sending the batteries 14.8 volts, the batteries are only receiving 14.34 volts, almost half a volt less than set point for my 6v batteries.  That results in chronic undercharging.  And in cases where the controller also uses those wires to measure the battery's state of charge, that voltage drop also results in inaccurate readings.  "Garbage in, garbage out" as they say in the IT industry.

Some people connect the output wires from their charge controllers to the output connections on their converter rather than running the wires directly to the batteries.  I would strongly advise against doing this, unless you know exactly how long the wire run is from the converter to the batteries, what size wire is used there and you have determined that the voltage drop is within an acceptable limit.  If those wires are long and/or too small, you're going to be introducing too much voltage drop into the system.

Don't cut corners on the wiring.  Don't cripple your system by doing this.  Larger wire costs a little more, but it will pay off in the long run by helping to maximize the efficiency of your system. 

It is true that at lower loads your voltage drop will be less pronounced.  So on cloudy days you will have less voltage drop between the controller and the panels than you would have otherwise.  And in absorption stage as the controller cuts the amperage output down, voltage drop will be reduced along the wire run between the controller and batteries. 

But I like planning for the worst case scenario, and building a little overkill into my system.  The result of doing that with my solar system has meant never running short of power.  Not even once.   If you want to save a little up-front cost with your system by cutting a few corners, that's your business, but keep in mind that it might bite you in the butt later.  Many people whose systems have been put together with undersized wire suffer the consequences of batteries that never get fully charged, and many of them jump to the conclusion that they don't have enough panels on the roof.  In reality, their wiring is choking the system, and adding more wattage on the roof without upgrading the wiring will just make the voltage drop even worse due to higher amperage coming down from the panels.

Besides the voltage drop issue, if the wire is excessively small it could potentially be a fire hazard.  Higher voltage drop means higher resistance in the wire, and with resistance comes heat.  The greater the resistance, the more heat produced.  Even if a fire isn't produced, you could easily melt fuse holders or the insulation around the wire, creating a shorting hazard.

Would you rather fill a swimming pool with a half-inch garden hose, or a 3-inch fire hose?  I'll take the fire hose, every time.  

Saving Money on Wire


20-foot, 4 gauge copper jumper cables

If your run is short enough you might save a little money without compromising your system as I was able to do.  I discovered that a set of 20-foot, 4 gauge copper jumper cables is a lot cheaper than 40 linear feet of 4 gauge copper wire from the local hardware store.  So I bought those, cut off the clamps at the ends, and used the wire in my system.  It works great. 

Even if your wire run from the panels to the controller is too long for this to work for you there, it should work between the controller and batteries, because you don't ever want a wire run even 20 feet long there.  In fact, if you can keep it to six feet that would be great. Or three.  The shorter, the better.  Play with the
Voltage Drop Calculator to see why.  You could use any excess left over from the jumper cables on the wire run from the controller to the kill switch (along the wire run from the panels).


Wiring Panels in Series to Reduce Voltage Drop

As I mentioned in an earlier post, you can get away with using smaller wires between the panels and controller if your system has higher voltages (for example, wiring two 17.4v panels in series to produce 34.8v), because voltage drop is not as bad in higher voltage DC systems.  You must have a controller that has the capability of bringing that voltage back down for your 12v battery bank, however.  To show how this works, here's an example:

Let's say we have 220 watts on the roof that consists of two 110 watt panels of 17.4v and 6.28 amps each,  and 30 feet of ten gauge wire connecting them to the charge controller.   Connected in parallel, together they are sending 17.4 volts and 12.56 amps down that wire.  Over the 30-foot run, there is a 4.31% voltage drop according to the voltage drop calculator.  We've already lost almost ten watts into thin air.

Now let's use the exact same system and the only thing we're changing is wiring the panels in series instead of parallel.  That doubles the voltage but not the amps, so now we're sending 34.8 volts and 6.28 amps down the wire to the charge controller (note that this is still 220 watts).  According to the voltage drop calculator, we now have a voltage drop of only 1.09%.  So now we've only lost a little over 3 watts, and all we did was change the way the wiring was connected! 

Of course this assumes our charge controller is capable of handling this higher voltage from the panels.  Make sure you buy a controller that has this capability if you are interested in this type of setup.  But keep in mind, if your system would otherwise work fine with a PWM controller it could be cheaper to just use bigger wire and keep panels wired in parallel rather than buying an expensive MPPT controller with this capability.  Do some research, and do the math for your own system.

Important note:  This doesn't change anything between the controller and the batteries - you still need adequately heavy wire there because those wires will still be in the 12v to 14+ volt range.


Fuses


Although it may not strictly be required, depending on your panel configuration, I think it is a good idea to add a fuse or circuit breaker to the positive side of each solar panel, assuming they're wired in parallel.  In the case of series wired panels, add a fuse on each series circuit.  A fuse should also be added along the positive lead from the charge controller to the batteries, near the battery bank.  To decide what size fuses or circuit breakers to use, this document might be helpful.


20 Amp Circuit Breaker

Inline Fuse Holder

Switches


You also need to provide a kill switch along the wire run from the junction box on the roof to the controller, as well as between the controller and the battery bank.  Wire these in along the positive cable on each of those runs.  This will provide you a way to shut the system down easily when you need to perform maintenance.


Kill Switch


Connectors and Mounting Hardware

In addition to wires, fuses and switches, you'll need connectors for your wires and mounting hardware for your panels.  For my system I just picked up some angle iron at the hardware store to build a rack for the panels, and got all the wire lugs and various connectors, nuts and bolts there as well.  I built the rack in such a way that the panels were mounted about six inches from the end of the rack that pivots when they are tilted up.  This way, when tilted, the panels are raised up above any possible shade from my vent covers.  


The rack is mounted to the luggage rack already on top of my camper, which I never used anyway.  This worked out well.  If you need to mount panels directly on the roof, there are various ways of doing that, such as bolts with sealant through the roof, or super sticky double-sided 3M tape, which I have zero experience with but have heard about.  And since heat affects solar performance you might want to make sure there is an air gap between your panels and the roof for cooling purposes. 

Personally, I hate putting holes in RV roofs.  It's just another leak waiting to happen.  But the thought of tape holding my expensive panels to the roof and the associated risk of injury or death, not to  mention potential damage and liability if they were to blow off, is more than a little scary as well.  If I didn't already have a roof rack to attach them to, I think I would consider mounting a panel rack by attaching cross bars across the width of the roof that bolted to the sides of the rig instead of the roof itself.  At least then water would never pool over the holes. 

Then again, my roof leak paranoia is probably showing.  Maybe with the proper sealant roof holes would be fine.


Let's Move On


OK, so now you've got all the components figured out as well as the necessary hardware to wire it all together.  What else do you need to worry about?  Well, there are several things.  First, where to mount your panels.  Second, where to mount your controller.  Third, how to monitor the system?  This is all covered in Part 9, Installation and Monitoring.

Part 7 - The Charge Controller

The charge controller's job is to take the electricity produced by your solar array and put it into your battery bank.  It should prevent that electricity from bleeding back out of your panels at night, and it should also prevent your array from overcharging or undercharging your battery bank.  But there are several kinds of charge controllers, some that are good at these functions, and some that are not so good.  There's also the question of whether or not you need a controller that has MPPT (Maximum Power Point Tracking) technology.  The answer to that question is "maybe."


The Morningstar Tristar TS-45 Charge Controller


Night Time Power Loss

Virtually all charge controllers prevent power loss through your panels at night, so that's not really an issue in deciding which controller to get.  And many of today's solar panels include diodes that prevent that anyway.  Back to the plumbing analogy - a diode is to electricity flow as a check valve is to water flow.  It allows current to flow in only one direction.


What Size?

Note - if you're planning on using higher than 12v nominal panels or wiring panels in series to increase array voltage, then reducing that voltage back down to 12v nominal with an MPPT controller, scroll down to the bottom of the "Do you Need MPPT" section and read the note regarding sizing the controller.  Otherwise keep reading here.

The first thing you need in terms of a charge controller is one that is big enough to handle the amps your solar panels can throw at it.  The number you want to look for is your panels' short circuit current rating, or Isc.  That number will be listed in the specs for the panel.  Add each panel's Isc to get the Isc for the entire array, then add another 25%.

That extra 25% is to account for a phenomenon called "edge of cloud effect," which at times could cause your panels to produce up to 25% or so higher than their combined short-circuit current rating.  Taking that into consideration, my panels (which have an Isc rating of 3.16 amps each, totaling 12.64 amps for the 4 of them) could potentially produce 12.64 + (12.64 x 0.25) = 15.8 amps, so I would need a charge controller that could handle at least that amount.  

The one I have will handle 45 amps, which obviously is overkill.  But I wanted a controller that would allow me to add more panels at a later date if desired without having to upgrade the controller.


Which Charging Algorithm?

The type of charging algorithm a controller uses is important.  Very inexpensive controllers often use an "on/off" algorithm meaning they will allow the electricity to flow into batteries until they reach a certain voltage and then they simply turn off.  That itself is a problem, but to add to the troubles, too often the voltage at which they turn off is too low, before the battery is anywhere near a full charge.  To charge these batteries fully the electrical current should be tapered down slowly after the batteries reach a certain voltage so they can absorb the power over several hours, until they are truly full. 

PWM (Pulse Width Modulation) charge controllers are great for this.  They utilize three stages in recharging your batteries:  Bulk, Absorption and Float.  And they often include an Equalization mode (which was described earlier).  


  1. Bulk Stage - During this first stage, the charge controller will allow all the electricity your panels can provide to be directed to the batteries as battery voltage increases.  This brings their state of charge up rapidly.  Once the state of charge reaches 90% or so (when battery voltage reaches the controller's "set point"), bulk stage is complete and the charge controller switches to 
  2. Absorption Stage - Electricity is still allowed to flow to the batteries, but at a gradually diminishing amperage while the voltage is held steady at the controller's set point.  Eventually the amperage is reduced to a small amount, at which time the batteries are essentially full and the controller switches to
  3. Float Stage -  In float stage, voltage flowing to the batteries is reduced to somewhere in the neighborhood of 13.4v (depending on the particular algorithm) and batteries are trickle charged, just to maintain the full state of charge.

Depending on the particular type and brand of batteries you have, the recommended set point varies.  The better charge controllers will allow you to set this number yourself instead of having it hard wired into the system.  


For my 6v golf cart batteries, set point is recommended to be 7.4v (14.8v for the two wired together in series). For many 12v deep cycle batteries, that number is lower, 14.4v, for example.  If the controller has a non-adjustable set point of 14.4v, it will work fine with batteries made to be charged at that voltage, but will not fully charge my pair of 6v golf cart batteries which could shorten their lives.  

Some inexpensive on/off charge controllers have a non-adjustable set point of as little as 13.2 volts, which is essentially a float charge and grossly inadequate for recharging deep cycle batteries fully.  Long term charging with this type of algorithm is almost guaranteed to shorten battery life if other measures are not taken to counteract the negative effects (regularly charging batteries fully via some other method and equalizing them).  This is why it is important to match your controller's set point with that of your batteries.
 

To learn more about PWM technology see this document produced by Morningstar Corp.


Do You Need MPPT?

Now to the question of MPPT.  Do you really need it?  Charge Controllers that use Maximum Power Point Tracking make your solar system more efficient by maximizing the number of watts of electricity that flow into your batteries.  It does this by forcing your solar panels to operate at the voltage which produces the maximum number of watts.  This voltage is called Vmp (maximum power voltage).  A PWM charge controller, on the other hand, essentially connects your solar panels to the batteries, which forces them to operate at the battery bank's voltage which most certainly would be quite a bit less than the panels' maximum power voltage.  That translates to a loss of watts.  

But the decision on whether or not to get an MPPT controller is not so cut and dried, and here's why.  MPPT works best when there is a big difference between your panels' Vmp and the battery voltage.  There are two things that typically affect this voltage difference:  Battery depth of discharge, and solar panel temperature. 

If your batteries are regularly deeply discharged before being charged back up again your charge controller will be in Bulk Stage longer, and Bulk Stage is where MPPT really shines.  When the charge controller switches to Absorption Stage, however, it is cutting back on the amps (and by definition, the watts) being allowed to flow into the batteries, so the benefit of having MPPT at this point is greatly diminished.  If you don't usually draw your batteries down too far on a daily basis (I fall into this category) your controller won't be spending much time in bulk stage, so the benefits of MPPT are not going to be as great.

Regarding temperature, Vmp is higher when solar cells are cool, as they typically are in winter.  A higher Vmp means more watts and a greater difference between panel and battery voltage, especially if your batteries are low, which means a bigger benefit to having MPPT.

So this combination of regularly deeply discharging your batteries (but not more than 50%) and camping in cooler climates makes MPPT a big benefit.  But if not, MPPT won't help you as much.

Add to the equation the fact that MPPT controllers are more expensive than non-MPPT controllers.  The MPPT version of the controller I have is about two and a half times more expensive.  In small solar systems it can be cheaper to just buy an extra panel to increase watts rather than buying an MPPT controller.  But, having said that, the price of MPPT controllers has been dropping, so you really have to get current prices and do the math yourself to see if it's worth it to you.


If you absolutely want to maximize the efficiency of your solar panels, get MPPT.  But realize that it could be an unnecessary extra expense, especially if you don't deeply discharge your batteries regularly, mostly camp in hotter climates, or have a sufficient number of watts on the roof to charge your batteries without the benefit of MPPT.  


For me, having 190 watts on the roof with tilting capability, a 220 amp hour battery bank and typically discharging my batteries only down to 85% or so, MPPT would make no sense at all.  My PWM controller more than meets my needs and has never let me down.  But your needs may be different.  This is another area of solar technology that needs to be evaluated based on personal usage.

Note - if you're planning on wiring panels in series or using 24v or 48v panels to charge your 12v battery bank, you must use an MPPT controller that has the capability to reduce that higher voltage down to nominal 12v before sending it to the batteries.  To size the controller properly in this situation, you need to read the specs on the panels and controller and make sure voltage limits of the controller are not exceeded.   This involves adding the open circuit voltage (Voc) in each string of your panels and multiplying by a factor determined by the expected temperature where they will be used, since temperature affects panel voltage.  See the video which explains how to size PWM and MPPT controllers on AltE's website:  AltE's Solar Videos


A good article that explains how MPPT works is this one from Northern Arizona Wind and Sun.

Temperature Sensing

Having temperature sensing capability on the charge controller is crucial, in my opinion.  Batteries are sensitive to fluctuations in temperature.  A cold battery is harder to charge and requires more voltage than a warm battery.  A warm battery is easier to charge and requires less voltage than a cold battery.  

Without temperature sensing, your controller ignores temperature and sends the same amount of energy to the batteries whether they are at 25 degrees or 95.  Batteries can easily be over or undercharged, possibly resulting in damage, just because of normal temperature variations by location or season.  

With temperature sensing, the controller will moderate the rate of charge according to temperature to protect your batteries and ensure they are charged properly.

Some charge controllers come with temperature sensors, and some don't.  Of the ones that do, some are built into the controller itself, while others have connections for a remote temperature probe which can be placed right at the batteries for accurate measurements.  Of the latter, some include the temperature probe as a standard item, some offer it optionally at extra expense.

Other Thoughts on Charge Controllers

If I were to design my system all over again I might do things a little differently.  These days there are some very inexpensive PWM charge controllers on the market, some that include in-unit temperature sensing.   Many of them have a static set point of 14.4v, which would work fine if I had batteries that had that recommended set point.  

You have to be careful, though, and read the specs.  Some of these cheap charge controllers are advertised as PWM controllers, but the fine print states the duration of absorption stage is as little as ten minutes, which is worthless.  Why they would even bother to design a controller that only spends ten minutes in absorption stage is beyond my comprehension.  It should be several hours at a minimum.  

Also beware of controllers that don't say what the specs are.   If they don't tell you the details, you can bet it's not good news.  The specs should tell you what charging algorithm is used (on/off, PWM, MPPT), what set point is (sometimes referred to as "boost voltage" which is confusing since many use the term "solar boost" as a synonym for MPPT), what system voltages (not to be confused with input voltage) the unit will work with (12v, 24v, 48v), whether or not temperature compensation is included, whether or not it will accept a remote temperature sensor, and if it's an MPPT controller it should specify how high the input voltage can be, etc.  If you still have questions after reading the specs it may be best to look elsewhere. 

One good inexpensive PWM controller I know of is Landstar (see ebay) which includes in-unit temperature sensing, connections for a remote temperature sensor and a user-adjustable set point.  I may have gone that route if it were available back when I put my system together.  It costs about 1/5 what I paid for my controller, but it comes from China so it takes a while to arrive.

If you'd prefer a well known, high quality brand and are not so worried about price, look for brands such as Morningstar, Xantrex, Blue Sky, or Rogue, to name a few.  

See part 9 of this series for a list of places to shop for solar equipment.

So, What's Next?


After deciding the type and number of batteries, number of solar panels and the charge controller you want, you need to hook it all together.  That means you need wires, fuses and switches.  Continue on to Part 8, Wires, Fuses and Switches.

Part 9 - Installation and Monitoring

Installing the system is fairly straightforward for anyone familiar with rudimentary electrical and mechanical work, and instructions are provided with new charge controllers or are easily found online by those venturing into this for the first time.  See below for wiring diagrams. I will point out some common pitfalls with RV Solar installations so you can avoid those.  And I'll talk a little about how to monitor your system's performance once it's operational.

I made a video of an installation I just did for my sister's new trailer which shows the entire process.  You can see it here:

Lance 1575 Solar Installation


How to Connect the System


Below are two diagrams showing the wiring runs for typical RV solar systems.  Both diagrams show panels wired in parallel in a nominal 12v system (meaning each panel's voltage is no higher than 22v or so).  As mentioned earlier, higher voltage panels may be wired in the same manner as long as a charge controller is used that is capable of reducing the voltage back down to nominal 12v for output to the batteries.  If you are wiring in more panels than that shown in the diagram wire them into the junction box the same as those shown.  The first diagram shows 12v batteries wired in parallel.  The second diagram shows 6v batteries wired in series.


RV Solar System with 12v Nominal Panels Wired in Parallel and 12v Deep Cycle Batteries Wired in Parallel


RV Solar System with 12v Nominal Panels Wired in Parallel and 6v Deep Cycle Batteries Wired in Series


Rules of Thumb:
  • Mount panels where they will not be shaded, not even partially shaded, by such things as a/c units, roof vents, rooftop satellite systems or antennas, etc.  Raise your vent lids and any other movable objects on the roof and consider how their shadows will travel across the roof before deciding where and how to mount your panels.  Even a partially shaded solar panel can have drastically reduced output.


Tilting these panels was a good idea considering this rig is being used in winter when the sun's angle is low.  But the satellite dish shades a large portion of one panel for about 75% of the day, and the a/c cover shades part of another panel as well.   Only one of the three panels is shade-free all day long.  This is not how you want to install your system. 


  • Mount your charge controller as close to the battery bank as possible.  If you're using flooded (wet cell) batteries, however, never mount the charge controller in the same compartment as the batteries, especially if that compartment is sealed.  The gasses emitted by wet cell batteries can corrode the electronic components inside your charge controller.  But you want that wire run to be as short as possible to minimize voltage drop. 


  • Before wiring your system together, cover your solar panels so they are not producing electricity, or disconnect wires to break the circuit.  This will prevent inadvertently shorting your system out and possibly damaging components.


  • Read the instructions that come with your charge controller.  I can't speak for all, but the instructions that came with my Morningstar controller were great.  It's one of the few instruction manuals I've kept after installation was complete, and I often refer back to it for information regarding my system.


  • Strongly consider buying a permanent meter to attach to your system for system monitoring purposes.

Regarding the last item, some charge controllers come with their own meters installed.  Some offer that as an optional item at additional expense.  Some are better than others, some more functional than others.  But having a good meter in your system can allow you to see how many amps are going into the system, what the current battery voltage is, how many amps you've used since the last full charge, etc., and allows you to see how much power individual appliances use.  They're great little devices. 


Thanks for Reading


Thanks for reading my thoughts on RV Solar.  It's something I knew little about before deciding to build my own system.  The process of learning about solar and eventually putting together my own system was something I found very enjoyable.  And I especially love being able to camp out in the middle of nowhere without a care in the world with regard to electricity usage, and without having to listen to the obnoxious drone of a generator. 

And as I said in the beginning, I'm certainly no expert, but I do have enough experience to pretend to be one on the internet.

Below are links mentioned throughout this series that you may find helpful in gathering more information on this subject.  Good luck with your system.


Wholesale Solar's U.S. Solar Insolation Map
KOA's Estimated Amperage Draw of Common RV Appliances
Northern Arizona Wind & Sun's Battery Information Page
The Battery Council International's Lead Acid Battery Page
Trojan's advice on battery maintenance

Peukert Effect Description
Peukert Effect Calculator
Physical Battery Size by Group Number from batterystuff.com
Voltage Drop Calculator
To Fuse or Not to Fuse?
Morningstar's Pulse Width Modulation (PWM) Document
Northern Arizona Wind and Sun's Explanation of MPPT

AltE's Video Tutorials including Charge Controller Sizing
How to connect your batteries correctly and efficiently


Where to buy?

I will list a few links here to products mentioned in or related to this article.  Note that as an Amazon Associate and an eBay Partner, I earn commissions from sales made through the links I provide here, but there is no increased cost to you.  Thank you for your support.